Thursday, July 2, 2015

Install Glassfish Server CentOS 7

Glassfish server adalah salah satu dari aplikasi server yang digunakan untuk "memasang" aplikasi java berbasis web. Server lain adalah tomcat. Namun pada pembahasan kali ini, hanya akan dibahas glassfish server pada centos 7.

Cara instalasi server ini sebagian besar penulis ambil dari sini. Namun untuk konfigurasinya, nyomot juga dari sini. Yuk mulai saja cara installnya....

Yang harus dipersiapkan untuk menjalankan server java ini tentu saja adalah Java Development Kit (JDK) yang bisa didownload dari oracle. Kenapa tidak menggunakan openjdk? Karena java adalah milik Oracle, sehingga pake aja produk pemiliknya sekalian, karena glassfish juga dikembangkan oleh Oracle, biar sedikit matching. Hehehehe

Untuk cara install JDK 8, penulis ambil dari sini. Caranya adalah sebagai berikut:

  1. cd /opt
  2. sudo wget --no-cookies --no-check-certificate --header "Cookie: gpw_e24=http%3A%2F%2Fwww.oracle.com%2F; oraclelicense=accept-securebackup-cookie" \ "http://download.oracle.com/otn-pub/java/jdk/8u25-b17/jdk-8u25-linux-x64.tar.gz"
  3. sudo tar xvf jdk-8u25-linux-x64.tar.gz
  4. chown -R root: jdk1.8.0_25
  5. sudo alternatives --install /usr/bin/java java /opt/jdk1.8.0_25/bin/java 1
  6. sudo alternatives --install /usr/bin/javac javac /opt/jdk1.8.0_25/bin/javac 1
  7. sudo alternatives --install /usr/bin/jar jar /opt/jdk1.8.0_25/bin/jar 1
  8. sudo rm /opt/jdk-8u25-linux-x64.tar.gz
Daannnn selesai. JDK 8 telah terinstall. Jika ketik "java" di terminal, maka akan muncul kurang lebih seperti berikut:

Setelah JDK 8 sudah terinstall dengan baik, maka sekarang saatnya install glassfish servernya dengan langkah seperti berikut:
  1. yum install unzip wget nano
  2. adduser --comment 'Glassfish User' --home-dir /home/glassfish glassfish
  3. su - glassfish
  4. wget http://download.java.net/glassfish/4.1/release/glassfish-4.1.zip
  5. unzip glassfish-4.1.zip
  6. rm -f glassfish-4.1.zip
  7. exit
Nah sampai pada langkah ini, sebenarnya binary file dari glassfish sudah terinstall. Langkah berikutnya adalah membuat service glassfish, agar bisa berjalan dari server.


Buat file glassfish menggunakan nano
nano /etc/systemd/system/glassfish.service
Pastekan ini ke dalam nano. Jika menggunakan terminal ubuntu, maka bisa menggunakan "ctrl + shift + v" untuk paste.

Sampai step ini, sebenarnya glassfish sudah dapat dijalankan. Namun kita harus melakukan setting terhadap konfigurasi servernya seperti konfigurasi security pada site ini, yaitu sebagai berikut:

Yang pertama, meng-enable secure admin
glassfish/bin/asadmin enable-secure-admin
Yang kedua, mengganti password admin dari password default
glassfish/bin/asadmin change-admin-password 
Tekan enter jika usernamenya masih tetap admin
Tekan enter lagi, karena password default glassfish adalah password kosong
Masukkan password yang diinginkan. Password ini akan digunakan untuk masuk ke dalam halaman admin glassfish.
Masukkan kembali password yang dimasukkan, sebagai konfirmasi
Jika muncul certificate seperti pada gambar di bawah ini, tekan saja "y", kemudian tekan enter....

Naahhh selesai. Glassfish siap dijalankan melalui https://ip-server:4848. Halaman loginnya adalah sebagai berikut


Sedangkan homepage admin (yang muncul setelah login) akan tampak seperti berikut


Sumber:
https://www.digitalocean.com/community/tutorials/how-to-install-java-on-centos-and-fedora
https://www.rosehosting.com/blog/install-glassfish-4-1-on-a-centos-7-vps/
https://www.nabisoft.com/tutorials/glassfish/installing-glassfish-41-on-ubuntu

Tuesday, June 30, 2015

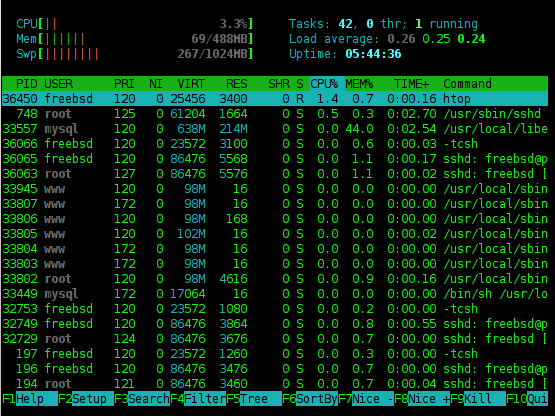
Install Htop in FreeBSD 10 Using Pkg

Htop is beautiful task manager on terminal.

You can install it with the step below
  • sudo pkg install htop
  • sudo ee /etc/fstab
  • Add "linproc /compat/linux/proc linprocfs rw,late 0 0" to the end of line
  • sudo mkdir -p /usr/compat/linux/proc
  • sudo ln -s /usr/compat /compat
  • sudo mount linproc
  • rehash
And done. You can type "htop" in the terminal and get beautiful task manager.

Tuesday, June 2, 2015

Enable 32 bit Environment on CentOS 7

Just execute this on terminal
yum install -y glibc.i686 glibc-devel.i686 libstdc++.i686 zlib-devel.i686 ncurses-devel.i686 libX11-devel.i686 libXrender.i686 libXrandr.i686
Source: https://fedoraproject.org/wiki/HOWTO_Setup_Android_Development

Monday, May 25, 2015

Install Phonegap Ubuntu


Install terlebih dahulu nodejs from source. Java SDK harus sudah terinstall terlebih dahulu dari cara di sini.
  1. Download source code nodejs 
  2. wget http://nodejs.org/dist/v0.12.4/node-v0.12.4.tar.gz
  3. extract
  4. tar xvzf node-v0.12.4.tar.gz
  5. Masuk ke folder source code tersebut
  6. cd node-v0.12.4
  7. Lakukan kompilasi
  8. ./configure
  9. make
  10. sudo make install
  11. Ubah permission folder tmp agar bisa dipakai oleh nodejs
  12. sudo chown -Rv namaUser /home/namaUser/tmp

Langkah berikutnya adalah install phonegap
  1. sudo npm -g install phonegap
  2. sudo npm -g install cordova

Langkah terakhir adalah setting Path android sdk
  1. Buka .bashrc dengan perintah "nano /home/namaUser/.bashrc"
  2. Tambahkan kedua export di bawah ini. Selain dimasukkan ke bashrc, eksekusi juga di terminal, sehingga efeknya langsung dapat dirasakan.
  3. export ANDROID_HOME=/home/akhfa/Android/Sdk
  4. export PATH=${PATH}:$ANDROID_HOME/tools:$ANDROID_HOME/platform-tools
Sumber jika ada error:
http://stackoverflow.com/questions/27211279/unable-to-fetch-platform-android-error-eacces
http://stackoverflow.com/questions/26356359/error-android-home-is-not-set-and-android-command-not-in-your-path-you-must-ful
http://stackoverflow.com/questions/18419144/npm-not-working-read-econnreset
http://stackoverflow.com/questions/21228995/how-to-clear-https-proxy-setting-of-npm

Friday, April 17, 2015

Install Java Oracle Centos 7

  1. wget --no-cookies --no-check-certificate --header "Cookie: gpw_e24=http%3A%2F%2Fwww.oracle.com%2F; oraclelicense=accept-securebackup-cookie" "http://download.oracle.com/otn-pub/java/jdk/8u25-b17/jdk-8u25-linux-x64.rpm"
  2. rpm -ivh jdk-8u25-linux-x64.rpm
Source: http://www.2daygeek.com/oracle-java-8-installation-centos-rhel-fedora/

Wednesday, December 31, 2014

Install Nagios from Sources in CentOS 6.X

Nagios is software monitoring. It can monitor server uptime, service, and so on. For more details, you can go here.

To install nagios, follow step below:

Wednesday, December 24, 2014

Set and Remove Proxy for Git

To set Proxy into git, do this step
  1. Open git console
  2. Type this
git config --global http.proxy http://proxyuser:proxypwd@proxy.server.com:8080
git config --global https.proxy https://proxyuser:proxypwd@proxy.server.com:8080
 Where:
  • proxyuser is username for proxy
  • proxypwd is proxy password for the username
  • proxy.server.com is address of the proxy. It can be IP address.
  • 8080 is proxy port. You can change it based on your proxy configuration
If you don't use username and password, you just need to use this format:
git config --global http.proxy http://proxy.server.com:8080
git config --global https.proxy https://proxy.server.com:8080
 If you want to unset proxy, just do this:
 git config --global --unset http.proxy
 git config --global --unset https.proxy

Saturday, December 13, 2014

Import Mysql Dump into PostgreSQL Ubuntu

First, you must dump mysql with command below
mysqldump --compatible=postgresql --default-character-set=utf8 -r nama_file.sql -u root -p db_name
 If you don't need mysql password, please remove "-p"

After that, you need to convert sql into psql. You can go github repository here.

After you get psql format, than you can import with
psql -U postgres -h localhost -d database_name -f nama_file.psql

Friday, November 14, 2014

Check File With High Disk Usage On Debian / Ubuntu

In server with limited disk space, high size file is very annoying if we can not find what file it is. So this command will show you what file that has high size
find / -type f -size +10000k -exec ls -lh {} \
"/" show that it will search in the root directory and 10000k means that the file must have > 10.000k (10MB) in size. You can change it based on your need.

Source:
http://www.cyberciti.biz/faq/find-large-files-linux/

Saturday, October 25, 2014

Change Hostname Permanently CentOS 6.5

To change hostname permanently, you need to do this
  • nano /etc/sysconfig/network
  • Change "HOSTNAME=yourNewDesiredHostname"
And the next step is
  • nano /etc/hosts
  • Change "127.0.0.1 yourDesiredHostname.com"
Finally reboot to take effect

Source: http://unix.stackexchange.com/questions/145019/how-to-change-hostname-on-centos-6-5

Tuesday, September 23, 2014

Resize Multiple Image Ubuntu

If you have many big size image and want to resize into smaller size, you can resize all image with just 1 command in terminal. This tutorial take example if you have many image with .JPG extension and you want to resize 25% of the original dimension

Sunday, September 21, 2014

Create Virtual Host Apache Ubuntu

Virtual host make a server can handle many domain on it. To make virtual host on apache, follow steps below. This tutorial needs prerequisite an apache installed.

Saturday, September 20, 2014

How To Check TUN/TAP or PPP is Enabled

To check if TUN/TAP is enabled on your server, type this
cat /dev/net/tun
If the result is
cat: /dev/net/tun: File descriptor in bad state
your module has been enabled on your server.

To check if PPP is enabled, do this
cat /dev/ppp
if you receive message
cat: /dev/ppp: No such device or address
the module has been enabled successfully.

Source:
http://forum.host1plus.com/vps-support/428-how-check-if-tun-tap-ppp-enabled-your-vps.html

Friday, September 19, 2014

Fix Owncloud High CPU Usage Ubuntu

Owncloud is the best free cloud storage software that can be installed on your server for now. But there are some bugs. The most annoying bug is owncloud client use about 50% of your cpu usage. To fix this, I just use a little tricky step, using little program named cpulimit. That program can limit cpu usage used by background program

Install squid33 in FreeBSD 9.2

  1. Add package squid33
  2. pkg_add -r squid33
  3. Masuk ke directory squid
  4. cd /usr/ports/www/squid33 
  5. Compile and choose some option that fit with your requirement
  6. make install clean
  7. You can edit your squid configuration in /usr/local/etc/squid/squid.conf
  8. Make squid cache
  9. squid -z
  10. Insert squid to system boot. Open /etc/rc.conf and add squid_enable="YES"
  11. Start your squid
  12. service squid start

Source:
http://wiki.squid-cache.org/KnowledgeBase/FreeBSD

Force Using https Instead of http Ubuntu 14.04

The main idea for this forcing is redirect your http://yourdomain.com to https://yourdomain.com. This tutorial use apache web server. To do this, follow this step:
  1. Open your web server configuration
  2. nano /etc/apache2/sites-available/000-default.conf
  3. Add this line before </VirtualHost>
  4. Redirect permanent / https://yourdomain.com
  5. Save and restart your apache
  6. service apache2 restart

Sumber:
https://wiki.apache.org/httpd/RedirectSSL

Install Comodo SSL Ke Apache Ubuntu 14.04

Sekilas tentang SSL
Istilah gampangnya adalah SSL memungkinkan kita untuk mengubah akses ke website dari http menjadi https. Keungguan https adalah adanya enkripsi dari komputer kita ke web server. Kalo mengirim password tanpa https, maka password akan dapat dengan mudah dibaca, sedangkan kalo pake https, maka semua data yang dikirim ataupun yang diterima akan di enkripsi, sehingga tidak mudah untuk disadap. Untuk tutorial kali ini, apache web server harus sudah terinstall dan IP yang digunakan adalah IP global yang static.

Hal yang perlu dilakukan untuk memasang ComodoSSL adalah sebagai berikut:

Friday, August 22, 2014

Enable Root Login Over SSH in FreeBSD 10.0

By default, we cannot login to FreeBSD over ssh. So, we must enable it from openSSH configuration.

Open /etc/ssh/sshd_config with your 'ee' text editor
ee /etc/ssh/sshd_config
Find this
#PermitRootLogin no
Change to
PermitRootLogin yes
Press escape, and then choose yes for save confirmation.

Finally, restart your ssh daemon
 service sshd restart
 ...and done. You can login with root remotely over ssh.

Source:
http://blog.bobbyallen.me/2011/07/22/how-to-enable-root-login-over-ssh-on-freebsd-8-2/

Thursday, August 7, 2014

Installing Flash Player Ubuntu In Single Step

Close all running Firefox

Open your terminal

Type "sudo apt-get install flashplugin-nonfree"

Now flash player should be working.

Source:
http://www.cyberciti.biz/faq/ubuntu-linux-how-to-install-flash-player-for-firefox/

Thursday, July 17, 2014

Deleting Single Iptables Rule

I look at my iptables rules
iptables -L
and get this
Chain INPUT (policy ACCEPT)
target     prot opt source               destination        
ACCEPT     all  --  anywhere             anywhere            state RELATED,ESTABLISHED
ACCEPT     icmp --  anywhere             anywhere           
ACCEPT     all  --  anywhere             anywhere           

Chain FORWARD (policy ACCEPT)
target     prot opt source               destination        

Chain OUTPUT (policy ACCEPT)
target     prot opt source               destination

For example I make rule to accept port 80, so I do this
iptables -I INPUT 3 -p tcp --dport 80 -j ACCEPT
and then iptables -L give us this
Chain INPUT (policy ACCEPT)
target     prot opt source               destination        
ACCEPT     all  --  anywhere             anywhere            state RELATED,ESTABLISHED
ACCEPT     icmp --  anywhere             anywhere           
ACCEPT     tcp  --  anywhere             anywhere            tcp dpt:http
ACCEPT     all  --  anywhere             anywhere
Look at third line, there is rule for accepting connection from port 80. The rule inserted in third line because I use 3 in this rule
 iptables -I INPUT 3 -p tcp --dport 80 -j ACCEPT
If we want to delete this single rule, do
iptables -D INPUT 3
So iptables -L give us
Chain INPUT (policy ACCEPT)
target     prot opt source               destination        
ACCEPT     all  --  anywhere             anywhere            state RELATED,ESTABLISHED
ACCEPT     icmp --  anywhere             anywhere           
ACCEPT     all  --  anywhere             anywhere
Source:
http://major.io/2007/02/09/delete-single-iptables-rules/